Wednesday, July 28, 2010

Seedlings - Body Parts

Body Parts is the first unit in a series of lessons that I have planned for children under the age of 12 months, which I call "Seedlings".  To learn more about the Seedlings lesson plans, please see my previous entry.


Nursery Rhyme –
Tony Chestnut (Repeat Motions Throughout)
Toe (Point to your baby’s toes)
Knee (Point to your baby’s knee)
Chest (Point to your baby’s chest)
Nut (Point to your baby’s head)
Nose (Point to your baby’s nose)
I (Point to your baby’s eye)
Love (Cross your arms across your chest)
You, (Point to your baby)
Toe-Knee-Chest-Nut-Nose-I-Love-You,
Toe-Knee-Nose-Nose-Nose!

Song –
Head, Shoulders, Knees, and Toes, Knees and Toes,
Eyes and Ears and Mouth and a Nose,
Head, Shoulders, Knees, and Toes, Knees and Toes!

Vocabulary –
Name off each body part as you give your baby a massage.


Activity –
Mr. Potato Head

Mommy’s Homework –
Treat yourself to a pampering of some body part – a pedicure, a manicure, a full body scrub, etc..

Literature –
Where is Baby’s Belly Button? by Karen Katz
Ten Little Fingers by Annie Kubler
Whose Knees are These? by Jabari Asim
Whose Toes are Those? by Jabari Asim


Friday, July 2, 2010

Free New York Lapbook Kit - Limited Time Only!

Mini State Lapbooks New York

I just received an e-mail telling me that CurrClick is currently offering the Mini State Lapbook Kit for New York for free at http://www.currclick.com/product_info.php?products_id=38085&it=1&filters=0_0_0_0_0&manufacturers_id=139

This is for a limited time only - and although it's not the materials that we use for lapbooks, it might be something that interests your family!  Be sure to check it out before it's too late!

Thursday, June 10, 2010

Seedlings Start

June 16th will be our official start of our "Seedlings" curriculum.  These activities will be focused on children under 12 months of age.  I wanted to start this with Kirsten around 4 months old, but with the various medical issues that we've been having with her, I've had to set it aside, but I feel that we are ready and hopefully these activities can take her mind off of the other things going on.

Each week there will be a theme, and accompanying literature, songs, nursery rhymes, activities, and a "Mommy's Homework" activity.  Any suggestions on more to add would be absolutely wonderful!

Our first weekly theme is Body Parts, so keep your eyes peeled for an update sometime next week!

Wednesday, May 12, 2010

Father's Day (or any other day!) Gift Idea

With Mother's Day over with and Father's Day coming fast, I wanted to link a craft project that I did last year for Father's Day with a bunch of my nephews and nieces.  Everyone had so much fun with this - from 2 years old to 12 years old, they all seemed to really enjoy, and I know the fathers liked the gifts, as well!

What you're going to need are:
Wooden Plaque (I get mine at Michaels for around $1.50 each - they come in all shapes and sizes - some are hangable, some are not)
Tacky Glue / Hot Glue
Googley Eyes
Permanent Marker (optional)
Glue Dots (optional)
Rocks


The first thing that you gotta do is go out and find your rocks!  We were extremely lucky, because we were at a beach that had all types of rocks in the sand.  Tell them to find a rock for each member of your family.  This is probably the funnest part for the little ones!

Then, I like to place a glue dot on the back of each googley eye, so that the kids are able to place them exactly where they want, and if they mess up, you can just pull it off and re-position it.  With tacky glue, this would get really messy.  Tacky glue is necessary, though, if your rocks aren't smooth enough for the glue dots to work.

Glue each rock down to the wooden plaque however you'd like and let it sit for a few hours so that the glue dries completely.  While you're waiting, you can write the names of each family member behind the rocks (I didn't do this on the rock below and I wish I would have now, because I've forgotten who some of those rocks are) and "The ____ Family" on the plaque.


This is the plaque Jase made his Papa for Father's Day.


He had so much fun with it that he also made this one for me for my birthday.  I was pregnant at the time, hence the strange hole in my "head".  Once Kirsten was born, he added the baby rock beneath us to complete our family!

Monday, April 19, 2010

Learn the States Resources


There's a great PDF currently available for free that comes with lesson plans and worksheets to learn the states and the state abbreviations.  I thought it'd be great for any of you who are tying the postcard swap into a unit.

Tuesday, March 16, 2010

Alabama Lapbook


We finally got around to using our first postcard - Alabama!  We made a lapbook that has the postcard (I printed off a copy of the back so that you could see both sides), the state quarter, the state bird and flower, the state flag, and a "find the state" map.  If you're interested at all in what I used in this lapbook, just let me know and I can e-mail you  copy!

Wednesday, February 3, 2010

The Postcard Swap has Offically Started!

Our first state, Alabama, sent out their postcards yesterday to kick off the start of our Postcard Swap!  If you are participating in this swap, be on the lookout for the postcards to reach your mailboxes soon!  Also, remember to check your e-mails regularly, in case I sent out an urgent update.

Thanks everyone!

By the way - ALL states have been filled, sorry to anyone that was still interested!

Saturday, January 16, 2010

"Learn the States" Postcard Swap - *ALMOST READY TO START!*


We've officially assigned half of the states to families, but I need your help with the other half!  Feel free to post something in your blog to try and recruit the last few states.  Or, do you have any family or friends that live in any of the following states that would like to join us?  Please send them along the information.

The states we still need are:
  • Delaware
  • New Hampshire
  • South Dakota
  • West Virginia

Has anyone else noticed that the Western/Southern states seem much more interested in this swap than the Northern states?  lol..  For awhile there, the only Northern states were my own family and Massachusetts.

I've also created the banner (above) and a button (below) that you can feel free to place in your blog/wherever else for more publicity:


Wednesday, January 13, 2010

My Heart - Part 1

The second official topic that we decided to study is the heart.  Although we aren't done with this unit yet, I wanted to show off what we've already done.  Keep in mind, if there are any worksheets you are interested in, just let me know and I can e-mail them to you!


The American Heart Association has some amazing activities and worksheets that you can do with your kids on their website - it's even organized my topic and age so that you can get exactly what you are looking for.  This is where we got the majority of our worksheets from, like the one pictured above.  Hannah learned what color our blood is, depending on if there is oxygen in it or not, and then colored the blood in the veins and arteries to match.

Next, we did an activity where I set out 5 quart-sized jars filled with "blood" (it was quite light colored blood.. I didn't want to use all of my red food coloring up.. lol).  I then explained to Hannah that the bigger our bodies, the more blood that are in them.  I set 1 of the jars in front of her and asked her which person on the Post-It Notes would have that much blood in them.  It took her awhile to get the hang of it, but here's what she ended up with:


Babies have approx. 1 quart of blood in their bodies.  (Kirsten wasn't too happy to be woken up for this picture.)


Children have around 3 quarts of blood in their bodies...


..and adults have 5 quarts of blood!  (Mark wasn't home to have his picture taken.. as if he would have anyways, lol)

The last thing we did for the day was read a book I printed off called "I'm Healthy, I'm Smart, I Take Care of My Heart" and Hannah got to color it.  More heart activities to come on Monday!

Postcard Swap *UPDATED 1-22-10*


There are a lot of pending requests out there, but yellow states shown above have officially been claimed.  We need your help to get more filled!  Forward the Postcard Swap information onto families that you know live in the white states - even better, post something on your blog to get the word out!  I'd love to get this swap started ASAP.  Until then, I will keep searching for more families!

I will continue updating this map every time I receive an e-mail claiming another state.

Tuesday, January 5, 2010

Postcard Swap


I am currently in the process of organizing a “Learn the States” postcard swap.  If your family would be interested in receiving a postcard from each of our 50 states (minus your own), and mailing out 49 postcards to the other participants, e-mail me and let me know which state you'd like to represent.  I’m figuring that each state would be assigned a specific week to send out, so the entire project would take almost a year to complete.  I’m so excited just thinking about receiving a postcard from a different state every week!


At my house, we plan on putting up a large map of the United States, and connecting each postcard that we receive to it’s corresponding state with a piece of yarn. (Michaels currently has large United States placements with a dry erase marker for only $1!)


The postcards will be somehow themed about the state that you live in (I know I see state postcards all of the time at places like Walgreens and gas stations, but you could feel free to make your own, as well!)  On the back of the postcards, I was thinking that your family could just write either a fun fact about your state or why you like living in your state.


If you are at all interested, keep in mind that you will be paying at least $14 worth of postage, as well as the cost of the postcards.  Your personal information, such as names and address will only be shared with the other participants of the swap.  Also, states are available at a first-come, first-served basis.  We are unable to accommodate more than 1 family per state, so if you are interested, be sure to get your name in right away! If you have any other questions, please let me know.  I plan on starting this as soon as we get a majority of the states assigned.  More details will be posted soon!

Saturday, January 2, 2010

Snowflakes & Ice Crystals


Can you figure out what this is?  Keep reading to find out!!!

NOTE: Until summer, all lessons will be completed by my 8 year old niece, Hannah.  The projects can be adapted for other ages, however, so hopefully everyone can get some ideas from these!  If you are interested in any or all of the worksheets that are used in our lessons, just leave a comment along with your e-mail, and I will be more than happy to share them with you!

Our first "official" unit was on Snowflakes.

To start off, she completed some worksheets dealing with Snowflakes.  The first was about Snowflake Analogies (Language Arts) and then we moved onto Temperatures in the United States (Geography).

We determined that since snowflakes are actually tiny crystals of ice, and the temperature has to be 32 degrees Fahrenheit in order for ice to form, that the outside temperature would have to be 32 degrees in order for it to snow. (I realize it's much more complicated than this - I wanted to keep it simple! lol)

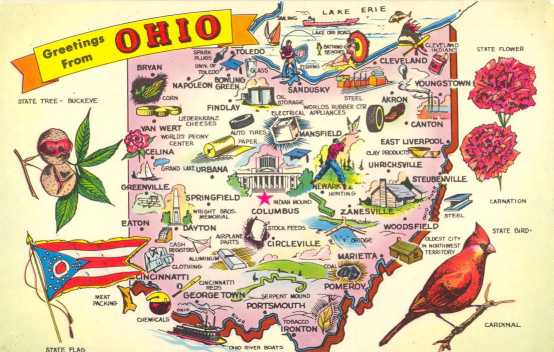
I gave Hannah a map of the USA, complete with average temperatures in December.  I had her determine whether or not there is currently snow in the state, depending on if the average temperature is higher or lower than 32 degrees.


Once she was done, we talked about how there is more snow in the Northern region of the United States than the Southern, due to being closer to the equator, and how the West coast doesn't get as much snow, due to the warm temperatures coming from the ocean.

Next, we went onto a lesson about Symmetry (Math).  First, we reviewed the concept of what Symmetry means, and then I explained how you can make a symmetrical shape by folding a piece of paper in half and cutting it out.  Once you unfold it, the shape will be symmetrical.  I then had her fold a paper circle in half 3 times and make random cuts (She didn't know what she was making at this point!)  Once she was finished, I had her open it and, guess what - it was a snowflake!  She counted the lines of symmetry (4) and I asked her how she would make a shape with 2 lines of symmetry.  When we got finished making our symmetrical shapes, she decided they looked like a snowman, so we attached them together, and she made him a symmetrical hat.


Since we were discussing how snowflakes are actually tiny crystals of ice, for our last project, we attempted to grow some "ice" crystals ourself (Science) - only we didn't want them to melt!  I figured since it was just before Christmas, this was a great opportunity to make some last minute gifts for her relatives.

To start off, we gathered all of the supplies:

For each ornament you make, you will need Borax, 1 Glass Jar, a pipe cleaner, some string, and a plastic utensil or some other type of long object, such as a dowel.

First, take the pipe cleaner and twist and bend it into the desired shape.  We made icicles, snowflakes, stars, candy canes, Christmas tress, and a reindeer.  Next, attach a piece of string to the top end of the pipe cleaner, and attach that string to the plastic utensil, making sure there is enough string for the pipe cleaner to be completely suspended within the jar, like this:


Next, we set the pipe cleaners aside and filled the glass jar approx. 3/4 full of water - be sure not to go too full or there won't be enough room for the Borax.  We put the jar in the microwave until the water started boiling (about 4 minutes per jar).  I then used potholders to remove the jar from the microwave and place it in a glass bowl so that we wouldn't make a mess.  Hannah added Borax little by little while stirring, until she wasn't able to make anymore dissolve (we used almost 1 1/2 cups per jar).  This was a great opportunity to talk about the term saturation and how the water can only dissolve so much Borax until it has reached it's limit.

Once there is white powder at the bottom of the jar that will not dissolve, no matter how much you stir, you are ready!  Go ahead and suspend your creation into the mixture, making sure it is fully covered.  Place the jar aside and wait!


(You will notice that the mixture will get clearer as it sets.  The green snowflake towards the front was the last one that we did, so it's still cloudy looking.  The candy cane to the left of it had been sitting for 10-15 minutes, so it cleared up.)

Depending on how much Borax the water dissolves, it will either be a few hours for the crystals to form, otherwise you might have to leave it overnight.  For us, it took around 4 hours for them to be complete.

The next part is optional, but I dipped each of them into a clear varnish and let them dry overnight.  This makes them much stronger, so the tiny crystals won't break off as easily.

I went and cut off the string and then tied some coordinating ribbon onto each one to make it into and ornament, and we wrapped them all up to give away at Christmas.  Here's how they all turned out!


If you end up making some crystal creations, I would love to see how they turn out!

Friday, January 1, 2010

Hello!

We had so much fun blogging about our Alphabet Adventure, that I decided to create a new blog to feature all of our adventures that we have in education.  We will continue to add alphabet related activities to Our Alphabet Adventure, so feel free to check there every once in awhile, as well!  Feel free to leave any comments, questions, or suggestions - we love any feedback that we get!